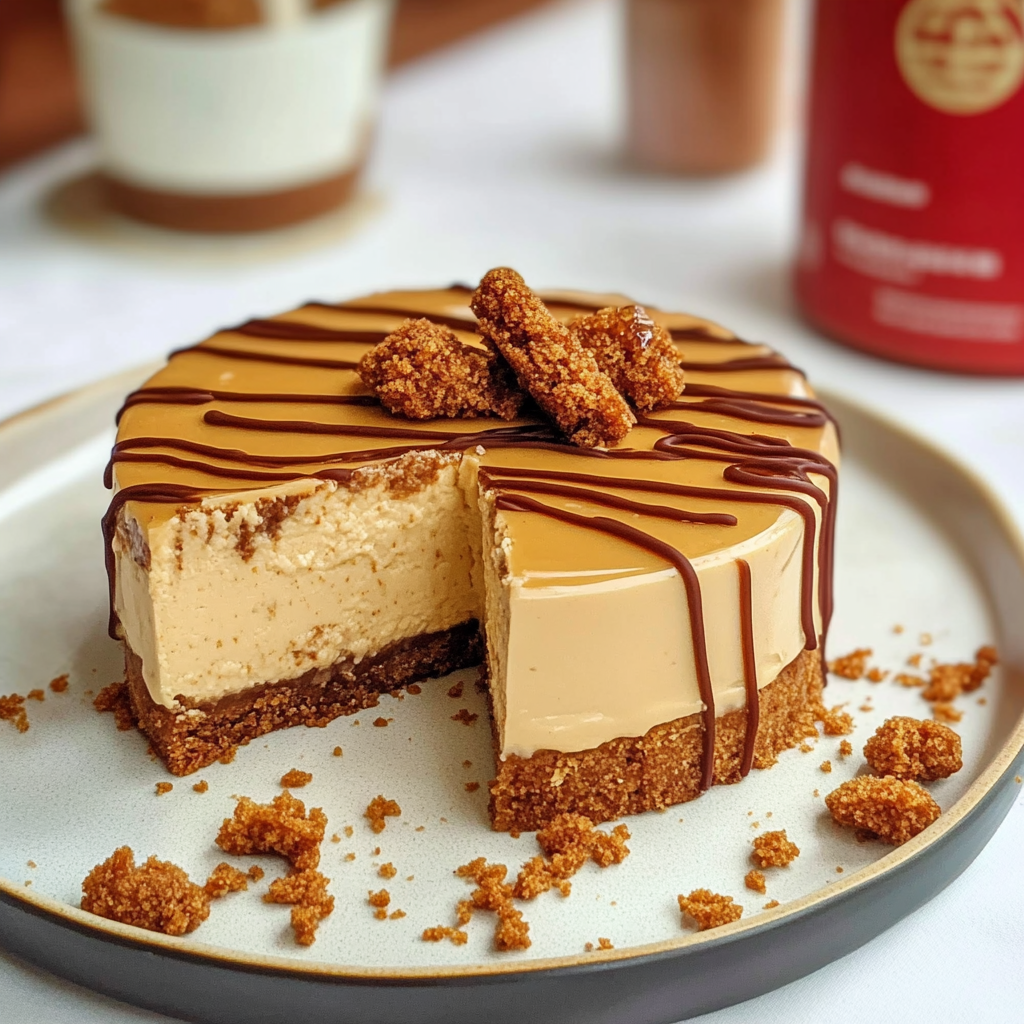
Indulging in a slice of Biscoff Cheesecake is like diving into a dreamy cloud of creamy goodness, with a hint of spice and sweetness that dances on your taste buds. Baklava-inspired cheesecake This dessert is not just a treat; it’s an experience, a hug in cake form that makes every day feel like a special occasion.

Jump to:
- Ingredients for Biscoff Cheesecake
- How to Make Biscoff Cheesecake
- <strong>Perfecting Biscoff Cheesecake Cooking Process</strong>
- <strong>Add Your Touch to Biscoff Cheesecake</strong>
- <strong>Storing & Reheating Biscoff Cheesecake</strong>
- <strong>FAQs About Biscoff Cheesecake</strong>
- What is Biscoff Cheesecake?
- How do you make Biscoff Cheesecake?
- Can I use different cookies for this cheesecake?
- How long does Biscoff Cheesecake last?
- <strong>Conclusion for Biscoff Cheesecake</strong>
- 📖 Recipe Card
Picture this: It’s a lazy Sunday afternoon, and you’ve just discovered the magical world of Biscoff spread. You take your first bite, and suddenly, all your worries melt away. This cheesecake is perfect for celebrations or simply because you deserve something delicious. Get ready to fall in love with this delightful dessert that promises an unforgettable flavor adventure.
Why You'll Love This Biscoff Cheesecake
- This amazing Biscoff Cheesecake offers more than just flavor; it makes meal prep a breeze
- You can easily customize the ingredients based on what you have on hand
- The vibrant colors and aromas make it visually stunning on any dinner table
- Perfect for gatherings but versatile enough for casual snacking
Ingredients for Biscoff Cheesecake
Here’s what you’ll need to make this delicious Biscoff Cheesecake: For more inspiration, check out this ultimate guide to baking recipe.
- Biscoff Cookies: These sweet, spiced cookies are the star of the show, providing a delightful crunch in both the crust and topping.
- Butter: Melted butter holds the crust together and adds richness to the flavor profile.
- Cream Cheese: Use full-fat cream cheese for that rich, creamy texture we all crave in cheesecake.
- Sugar: Granulated sugar sweetens the filling just right, balancing out the spices from the cookies.
- Sour Cream: This adds tanginess and creaminess, elevating our cheesecake to divine levels.
- Biscoff Spread: For that extra layer of indulgent flavor, swirl some of this heavenly spread into the filling!
- Vanilla Extract: A splash of good-quality vanilla enhances all those wonderful flavors beautifully.
The full ingredients list, including measurements, is provided in the recipe card directly below.
How to Make Biscoff Cheesecake
Follow these simple steps to prepare this delicious Biscoff Cheesecake:
Step 1: Prepare Your Crust
Start by preheating your oven to 350°F (175°C). Grab a food processor and crush those Biscoff cookies until they resemble fine crumbs. Combine them with melted butter in a mixing bowl until well mixed.
Step 2: Create the Base
Press the cookie mixture firmly into the bottom of your springform pan to form an even crust. Bake it in your preheated oven for about 10 minutes until slightly golden. Let it cool while you tackle that creamy filling.
Step 3: Make the Filling
In a large mixing bowl, beat together softened cream cheese and sugar until smooth. Add sour cream and vanilla extract while mixing at medium speed until combined. Now comes the fun part—add that luscious Biscoff spread and mix till it’s creamy heaven!
Step 4: Assemble Your Cheesecake
Pour your cheesecake filling over the cooled crust and smooth out with a spatula. For added flair (and flavor), swirl some extra Biscoff spread over the top using a knife or toothpick.
Step 5: Bake
Place your cheesecake back into the oven and bake for about 50-60 minutes. It should be set around the edges but still slightly wobbly in the center—that’s how you know it’ll be creamy!
Step 6: Cool Down
Once baked, turn off the oven and leave your cheesecake inside with the door slightly ajar for about an hour—this helps prevent cracks! Afterward, let it cool completely at room temperature before refrigerating for at least four hours (or overnight if you’re feeling patient).
Transfer to plates and garnish with crushed Biscoff cookies or whipped cream for that perfect finishing touch! Enjoy every delectable bite of this amazing Biscoff Cheesecake! cheesecake-inspired cookies.
You Must Know About Biscoff Cheesecake
- This amazing Biscoff Cheesecake offers more than just flavor; it makes meal prep a breeze
- You can easily customize the ingredients based on what you have on hand
- The vibrant colors and aromas make it visually stunning on any dinner table
- Perfect for grilling but versatile enough for baking or pan-searing
Perfecting Biscoff Cheesecake Cooking Process
Start by making your crust with crushed Biscoff cookies, then prepare the creamy filling while the crust cools. Once both are ready, assemble and chill to let those flavors mingle beautifully.
Add Your Touch to Biscoff Cheesecake
Feel free to switch out Biscoff cookies for gingersnaps for a spicy twist, or add a layer of caramel sauce between the crust and filling for extra indulgence.
Storing & Reheating Biscoff Cheesecake
Store leftover Biscoff Cheesecake in an airtight container in the fridge for up to five days. For best results, enjoy it cold straight from the refrigerator; no reheating required!
Chef's Helpful Tips for Biscoff Cheesecake
- This amazing Biscoff Cheesecake offers more than just flavor; it makes meal prep a breeze
- You can easily customize the ingredients based on what you have on hand
- The vibrant colors and aromas make it visually stunning on any dinner table
- Perfect for grilling but versatile enough for baking or pan-searing
Sometimes I catch my friends sneaking bites of this cheesecake when they think I’m not watching; it’s like they forget their manners when dessert is involved!
FAQs About Biscoff Cheesecake
What is Biscoff Cheesecake?
Biscoff Cheesecake is a delicious dessert that combines the rich, caramelized flavors of Biscoff cookies with creamy cheesecake. This no-bake cheesecake features a buttery cookie crust made from crushed Biscoff cookies, layered with a smooth filling of cream cheese, sugar, and whipped cream. Biscoff Cookie Butter Rolls It’s often topped with a drizzle of Biscoff spread for an extra touch of sweetness. This treat is perfect for any occasion, whether it be a family gathering or a special celebration.
How do you make Biscoff Cheesecake?
To make Biscoff Cheesecake, begin by preparing the crust using crushed Biscoff cookies mixed with melted butter. Press the mixture into the bottom of a springform pan and chill to set. For the filling, beat cream cheese and sugar until smooth, then fold in whipped cream or whipped topping to create a light texture. Pour the filling over the crust and refrigerate until firm. Finally, top it with drizzled Biscoff spread before serving for added flavor.
Can I use different cookies for this cheesecake?
Yes, you can use various cookies to create different flavors of cheesecake. While the classic recipe uses Biscoff cookies for its unique taste, alternatives like Oreos or graham crackers can work well too. Just ensure that the cookie choice complements the cheesecake filling and brings out delicious flavors. Experimenting can lead to delightful results and new favorite variations!
How long does Biscoff Cheesecake last?
Biscoff Cheesecake can last in the refrigerator for up to five days when stored properly in an airtight container. If you want to keep it longer, consider freezing individual slices wrapped tightly in plastic wrap and foil. Thaw them in the fridge before serving for best results. Enjoying this dessert fresh ensures you savor its creamy texture and flavor at their peak!
Conclusion for Biscoff Cheesecake
Biscoff Cheesecake is an indulgent dessert that perfectly balances creamy richness with caramelized cookie goodness. By following simple steps to create both its crust and filling, anyone can enjoy this delightful treat at home. rich brownie bread Whether served at gatherings or as a personal indulgence, its unique flavor profile makes it memorable. Don’t miss out on trying this delectable Biscoff Cheesecake; it’s sure to become a favorite!
Did You Enjoy Making This Recipe? Please rate this recipe with ⭐⭐⭐⭐⭐ or leave a comment.
📖 Recipe Card
Print
Biscoff Cheesecake
- Total Time: 1 hour 20 minutes
- Yield: Serves approximately 8 slices 1x
Description
Biscoff Cheesecake is a dreamy dessert that combines the rich, caramelized flavors of Biscoff cookies with a creamy cheesecake filling. Each slice offers a delightful crunch from the buttery cookie crust and a luscious sweetness from the Biscoff spread, making it perfect for any occasion. Indulge in this decadent treat that promises to impress your guests and satisfy your sweet cravings.
Ingredients
- 200g Biscoff cookies (about 2 cups crushed)
- 100g unsalted butter (melted)
- 450g cream cheese (softened)
- 100g granulated sugar
- 200g sour cream
- 150g Biscoff spread
- 2 tsp vanilla extract
Instructions
- Preheat oven to 350°F (175°C). Crush Biscoff cookies in a food processor until fine crumbs form. Mix with melted butter until well combined.
- Press the cookie mixture into the bottom of a springform pan to form an even crust. Bake for 10 minutes, then let cool.
- In a large bowl, beat cream cheese and sugar until smooth. Add sour cream and vanilla; mix until combined. Fold in Biscoff spread.
- Pour filling over cooled crust and smooth out with a spatula. Swirl extra Biscoff spread on top if desired.
- Bake for 50-60 minutes until set around edges but slightly wobbly in center. Turn off oven and let cool inside for an hour before refrigerating for at least four hours or overnight.
- Garnish with crushed Biscoff cookies or whipped cream before serving.
- Prep Time: 20 minutes
- Cook Time: 60 minutes
- Category: Dessert
- Method: Baking
- Cuisine: American
Nutrition
- Serving Size: 1 serving
- Calories: 380
- Sugar: 25g
- Sodium: 250mg
- Fat: 26g
- Saturated Fat: 15g
- Unsaturated Fat: 9g
- Trans Fat: 0g
- Carbohydrates: 36g
- Fiber: 1g
- Protein: 5g
- Cholesterol: 80mg